Menu Planning 101
MEAL PLANNING 101 PRINTABLE

If you want to switch any of the meals out in your printable meal plan, all my easy meals are found here: SUPER EASY RECIPES
How to Create a booklet or book
Create a booklet or book
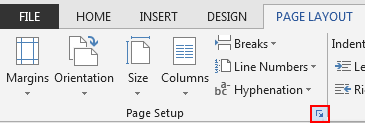
- On the PAGE LAYOUT tab, click the icon at the bottom-right corner of the Page Setup group to pop out the Page Setup window.
- On the Margins tab, under Pages, change the setting for Multiple pages into Book fold. The orientation automatically changes to Landscape.
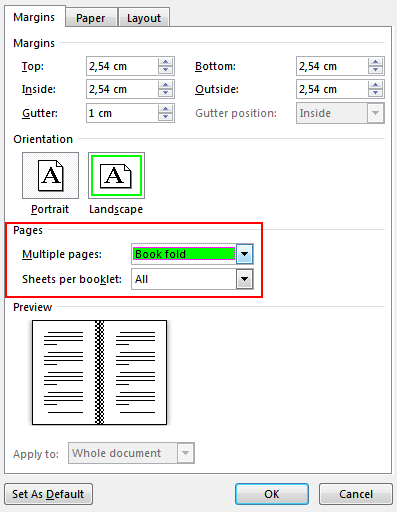
Tip: If you have a long document, you might want to split it into multiple booklets, which you can then bind into one book. Under Sheets per booklet, choose how many pages to print per booklet.
- To reserve space on the inside fold for binding, increase the width of the Gutter.
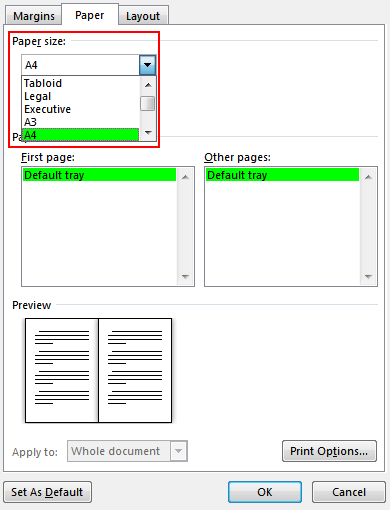
- On the Paper tab, select the Paper size. Keep in mind that the final size of the booklet is one half of the paper size. Make sure your printer is stocked with paper of the right size.
Tip: You can add many embellishments to your booklet’s appearance. For example, to add borders to every page, on the Layout tab of the Page Setup window, click Borders.
- Click OK. If your document already has content, the text is formatted automatically, but you might need to adjust objects like images and tables manually.
Tip: An easy way to make sure that a table doesn’t flow over the margins is to right-click the handle on the top-left corner of the table, and select AutoFit > AutoFit to Contents.
Print settings for booklets
When you print the booklet, check the print settings to make sure you print on both sides of the paper and flip the papers correctly for the printing to work as intended.
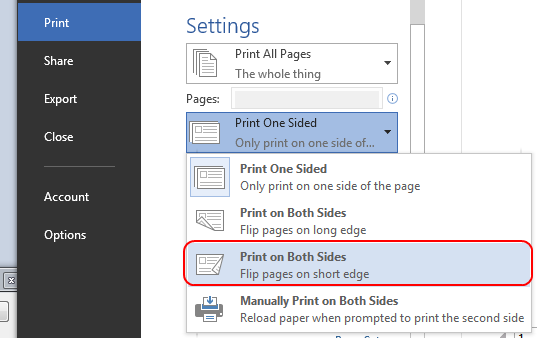
- Click FILE > Print.
- If your printer supports automatic printing on both sides, under Settings, change Print One Sidedto Print on Both Sides. Choose the option Flip pages on short edge to avoid printing the second side of each sheet upside down.
 If your printer doesn’t support automatic printing on both sides, select Manually Print on Both Sides, and feed the pages back to the printer when prompted. To avoid pages from printing upside down, flip the sheets on the short edge of the paper according to your printer’s instructions.
Tip: For a professional touch, consider adding page numbers in the header or the footer. For example, if you want to have page numbers appearing on the outer bottom corner of each page, set up a different page number format in the footers of odd and even pages.